
Playback
Playback is where you review recorded footage. One vertical timeline covers recordings, events and the live edge: drag it and the picture follows. This page explains the timeline, every control on the player, multi-camera review, and what to expect when footage lives on a network share.
Opening Playback
Section titled “Opening Playback”Open Playback from the navigation rail. It starts at the live edge of the first camera. Other ways in open a specific camera, and some open a specific moment:
- Playback on a Dashboard tile, or View recordings under an opened camera, opens that camera live.
- An event in Alarms, in Recent Detections on the Dashboard, or a push notification opens the camera at the moment the event started.
- A link copied with Copy link to this moment opens the same camera and moment for anyone who is signed in and may see that camera.
The screen
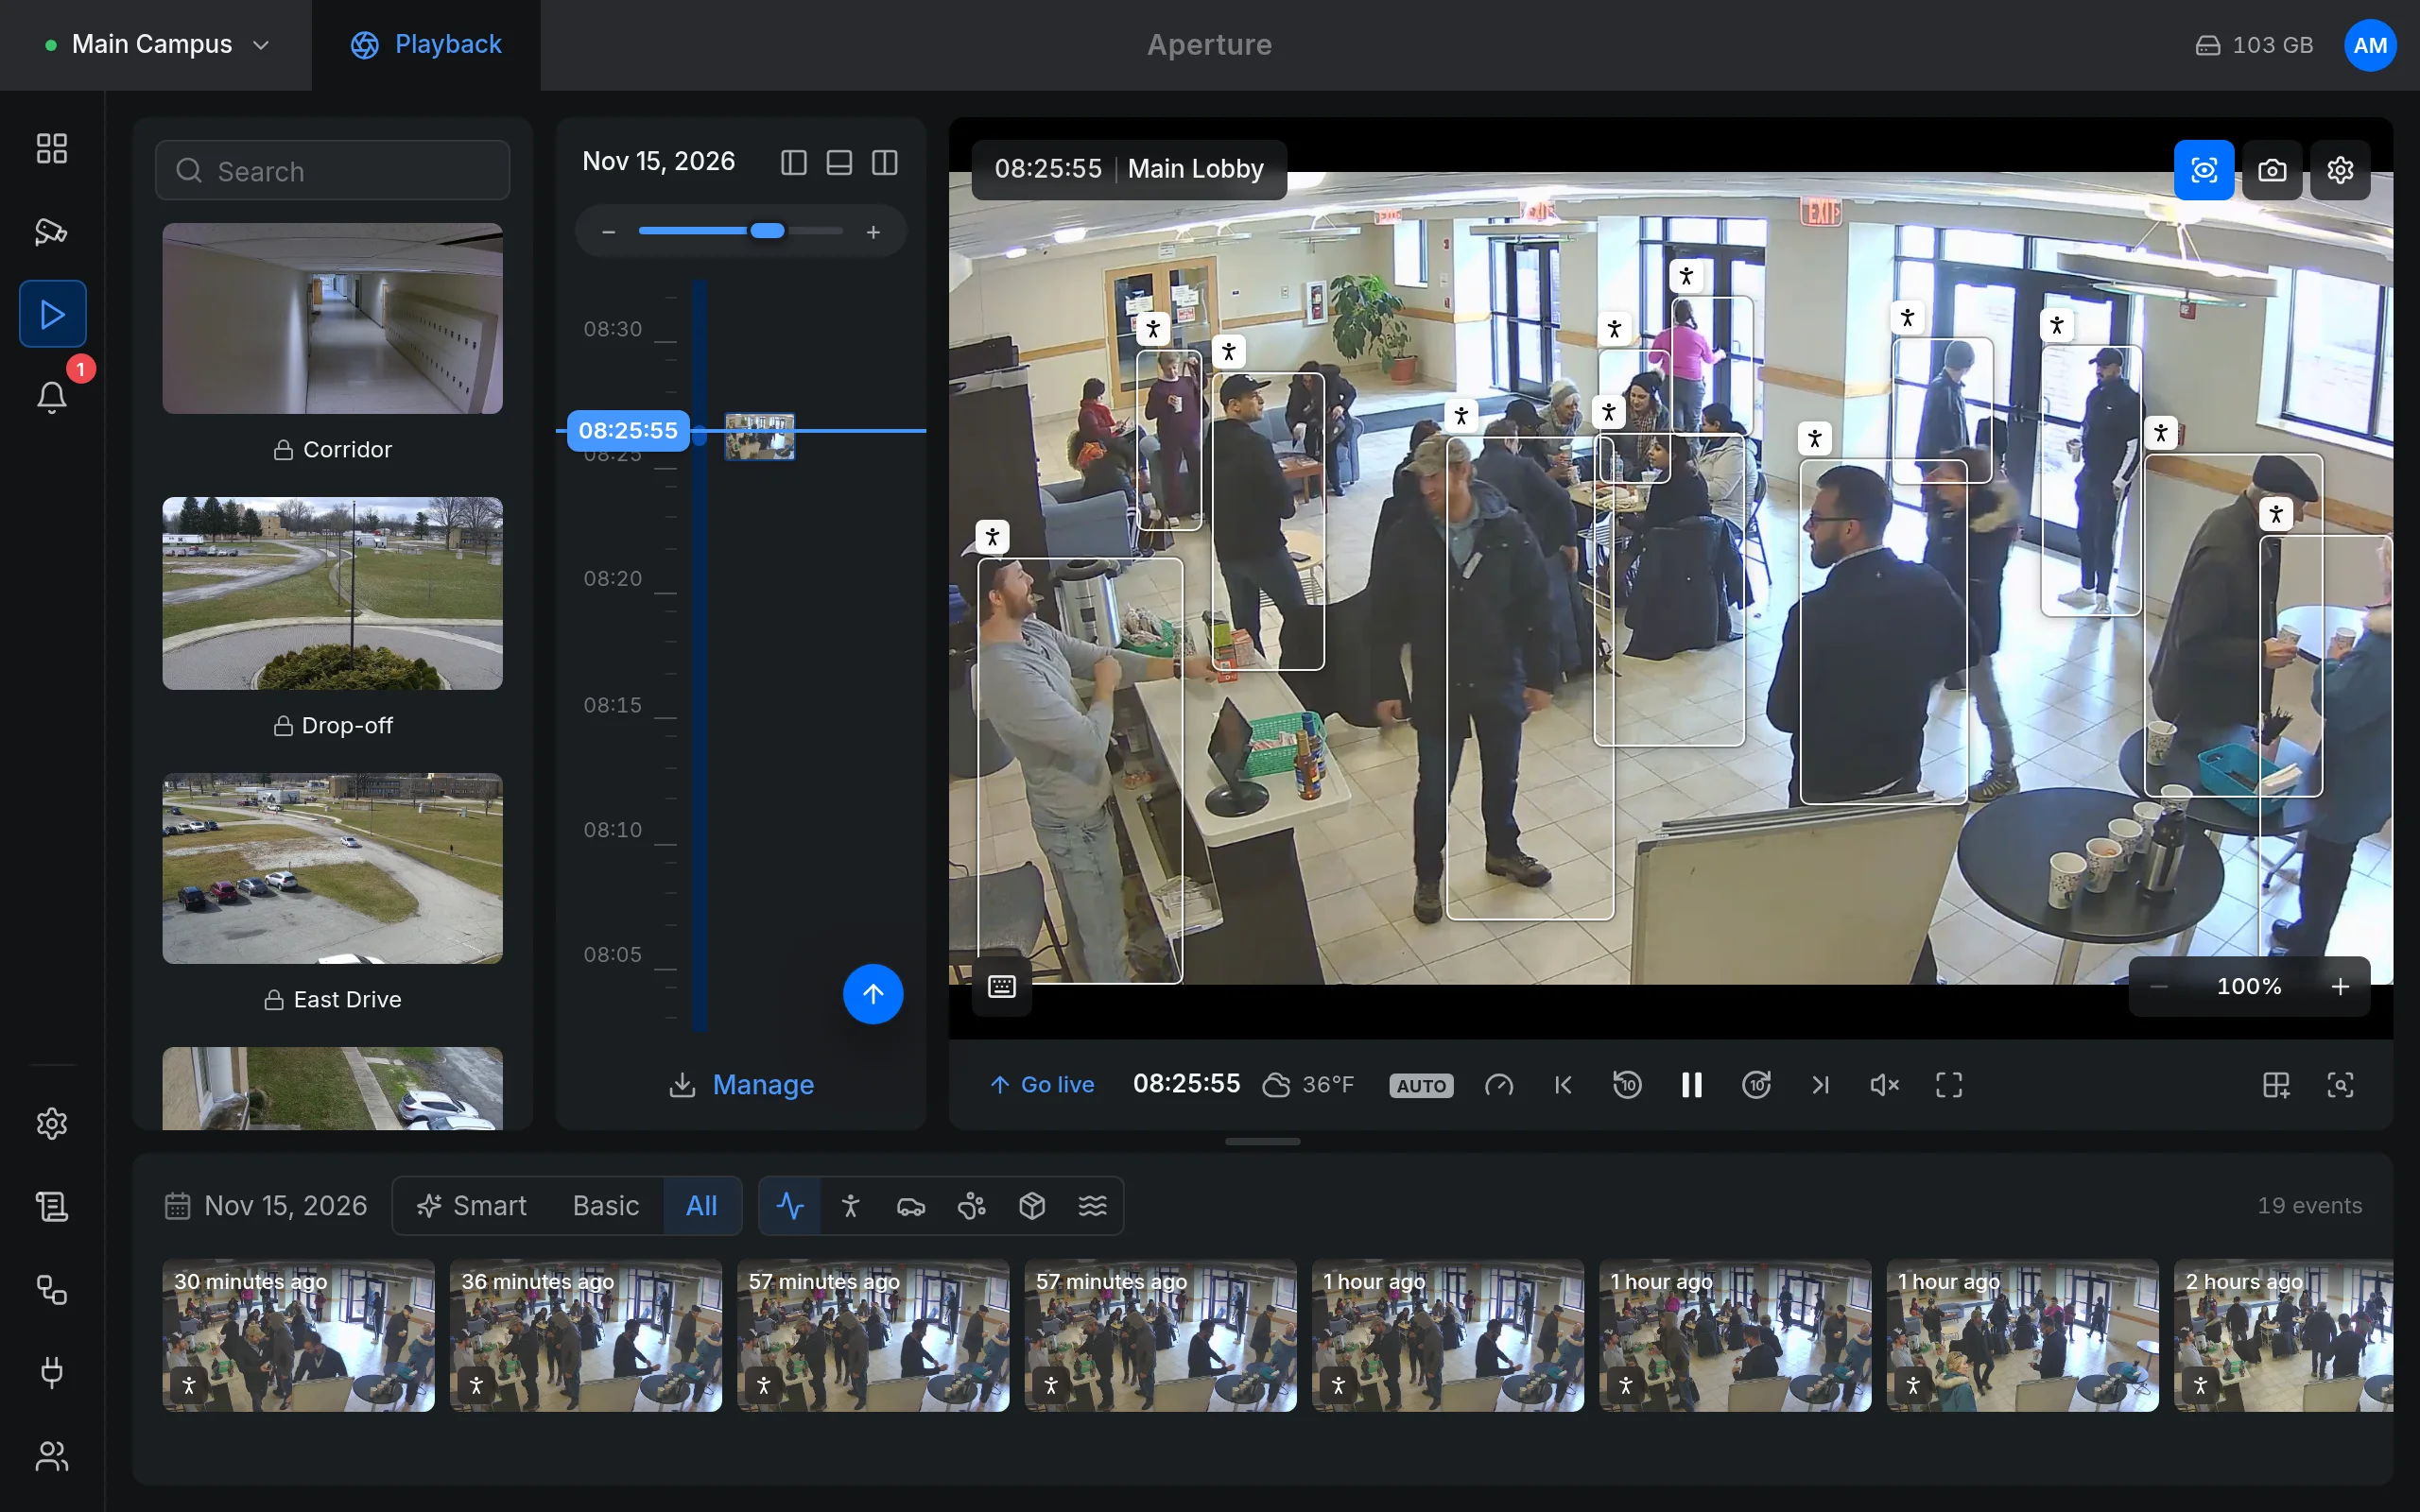
Section titled “The screen”On a desktop the screen has four parts:
- The camera list on the left. Search filters it; click a camera to switch to it.
- The timeline column. Its header shows the date being played and three buttons: Hide the camera list, Hide the events panel and Flip timeline to the other side. Below them is the zoom control, then the timeline, then Manage.
- The player, with a control bar under the picture.
- The events panel along the bottom.
Your browser remembers whether the camera list and the events panel are shown. Hiding both gives the player nearly the whole screen.
The timeline
Section titled “The timeline”The timeline runs top to bottom: the newest time is at the top and the past continues downward. The playhead is the blue line fixed near the top, with the current position in a blue label. At the live edge the label reads LIVE and new footage grows in beneath it.
Colours
Section titled “Colours”The rail has three states and nothing else:
| Rail | Meaning |
|---|---|
| Grey | Nothing recorded |
| Blue | Recorded |
| Lighter blue | Motion or another event |
Events that follow each other closely merge into one continuous band, so a busy hour reads as a solid bar rather than a row of dots. Each band gets a small thumbnail beside the rail where there is room; click a thumbnail to jump to the start of that event.
A grey stretch in the middle of the day is normal for a camera that records on motion only, and also appears while a camera was offline or its recorder restarted. See Recording.
Scrubbing
Section titled “Scrubbing”- Drag the timeline with the mouse or a finger. Drag up to go back in time, down to come forward.
- Scroll with the mouse wheel or trackpad: scrolling down goes back in time.
- Click a point on the timeline to jump straight to it.
The picture does not reload while you scrub. The player moves to the new position once you let go, or a moment after you stop scrolling.
The live edge
Section titled “The live edge”When you let go close to the present, the timeline springs back to live. “Close” scales with the zoom: 5% of the visible span, but at least 5 seconds and at most 90 seconds. You can pull the timeline past the present; it resists more the further you pull and springs back to live when you let go.
While you are in the past, a thin blue line on the timeline marks the present, and a round Jump to live button appears at the bottom right of the timeline. Go live in the control bar does the same. Both glide back to the live edge rather than cutting to it.
The zoom control above the timeline sets how much time the timeline shows at once, from 12 hours down to 5 minutes:
12 h, 6 h, 4 h, 3 h, 2 h, 90 min, 1 h, 45 min, 30 min, 20 min, 15 min, 10 min, 5 min.
Use − and + or drag the slider. Time labels and tick marks adjust to keep an even spacing at every zoom. The span you start with is a personal preference: Settings › General › Default timeline span (12 hours, 4 hours, 2 hours, 1 hour, 30 minutes or 10 minutes; 30 minutes by default).
Midnight and long ranges
Section titled “Midnight and long ranges”The rail is drawn from the selected day plus the day before and after, so recorded stretches run straight across midnight instead of stopping at 00:00. The player itself loads footage one day at a time.
While you look at today, the timeline and events refresh every 15 seconds.
Weather ribbon
Section titled “Weather ribbon”Turn on Settings › General › Weather ribbon on timeline to draw the day’s temperature as a line down the right side of the timeline (further right is warmer) with small blue marks where it rained. It needs a site location; see Site and weather.
The control bar
Section titled “The control bar”From left to right:
| Control | What it does |
|---|---|
| LIVE or Go live | Shows that you are live, or takes you back to live. |
| Time and weather | The time at the playhead and the weather at that moment, rebuilt from weather history. The weather shows when the window is wide enough. |
| Change global viewer quality | High (HD), Auto or Low (SD). Applies to live video only. High (HD) and Auto use the camera’s main stream, Low (SD) its sub stream; see Live view. |
| Playback speed | 0.5×, 0.75×, 1×, 1.25×, 1.5×, 2× or 4×. Greyed out while live. |
| Previous motion event / Next motion event | Jumps to the start of the previous or next event of this camera on this day. |
| Back 10 seconds / Forward 10 seconds | Skips 10 seconds. Back 10 seconds also works from live. |
| Play / Pause | Pauses recorded footage. While live it is greyed out: scrub the timeline to review. |
| Unmute / Mute | Playback starts muted, live and recorded alike. |
| Fullscreen | Puts the player on the whole screen. |
| Multi-camera playback | See Several cameras at once. |
| Grid search (motion area) | See Grid search. |
Controls that only make sense for recorded footage stay in place, greyed out, while you are live, so nothing moves under the pointer when you go live.
Picking a date and time
Section titled “Picking a date and time”Click the date at the top of the timeline column (Pick a date and time). Choose a day in the calendar, set Hour and Minute, and click Apply. You cannot pick a time in the future.
Keyboard shortcuts
Section titled “Keyboard shortcuts”Hover over the keyboard button at the bottom left of the picture to see the list. The keys work anywhere on the Playback screen except while you type in a field.
| Key | Action |
|---|---|
| Space | Play or pause recorded footage |
| ↑ / ↓ | Forward or back 1 second |
| ← / → | Back or forward one frame (pauses first) |
| J / L | Slower or faster, one step through the speed list |
| F | Fullscreen (not listed in the hover help) |
The frame step uses the frame rate set for the camera, or 15 frames a second when none is set.
On the picture
Section titled “On the picture”The top left shows the time at the playhead and the camera name. The buttons at the top right are:
- Picture settings and the spotlight button, while live and only for cameras that support them. See Live view.
- Show object boxes / Hide object boxes, the same switch as on the Dashboard.
- Take snapshot.
- Camera settings, for administrators, opens the camera editor. Other users see the icon greyed out.
- Buttons added by extensions, always after the built-in ones.
Object boxes on recorded footage
Section titled “Object boxes on recorded footage”For events that live object recognition followed, boxes move along each object’s recorded path as the video plays. Older events, and events tagged by an external detection server, have only their best sighting; that box shows, standing still, while the playhead is inside the event.
Snapshot
Section titled “Snapshot”Take snapshot saves the frame on screen as a JPEG at the video’s full resolution, recorded or live. The file name is the camera name and the time you saved it, not the time in the footage.
Picture zoom
Section titled “Picture zoom”The zoom control at the bottom right of the picture magnifies it digitally, in 50% steps up to 800%. Past 100% a small navigator shows which part of the picture you see; drag the box in it to move around. Click the percentage to return to 100%. Object boxes follow the zoom. Zoom resets when you switch camera and is not available in multi-camera playback.
The events panel
Section titled “The events panel”The panel under the player shows the selected camera’s events for the selected day, newest first, with a thumbnail, how long ago it happened and an icon for its type. Click a thumbnail to jump to the start of that event.
- Smart shows events where an object was recognised, Basic plain motion without a label, All everything. Audio events appear only under All.
- The type buttons narrow it to People, Vehicles, Animals, Packages or Audio. They are hidden under Basic.
- The count at the right says how many events match.
Drag the handle on the panel’s top edge to make it taller; past a certain height the single row becomes a grid. Event types are explained in Events and alarms.
Grid search
Section titled “Grid search”Grid search finds the events in which something moved in one part of the picture, such as a gate or a parked car.
- Click Grid search (motion area) in the control bar.
- Drag a rectangle over the picture. A faint grid shows the cells motion detection works with.
- Click Apply.
The timeline and the events panel now show only events whose motion touched that area. A button at the bottom of the picture reads Motion area with the number of matching events; click it to clear the search. Clear area in the grid search bar removes the rectangle without leaving the tool, Cancel leaves it unchanged.
Grid search works on the selected camera’s events for the selected day. Audio and package events have no motion area, so they are hidden while a search area is set. It is not available in multi-camera playback.
Several cameras at once
Section titled “Several cameras at once”Multi-camera playback plays several cameras side by side, all following one timeline, so you can follow someone from the drive to the door.
- Click Multi-camera playback in the control bar.
- In Add Cameras to Playback, tick the cameras. Search Camera Name filters the list and Last Event shows when each camera last saw something. The preview shows the layout.
- Click Add (or Apply when a multi-camera view is already open).
The layout follows the number of cameras: two side by side, three as two above one, four in a square, five or more in three columns. The timeline, the events panel and the event buttons keep following the camera you started from. Remove a camera with the × on its tile, or click End multi-view in the same dialog to return to the camera you started from.
Some controls are single-camera only and disappear in this mode: playback speed, grid search, picture zoom, snapshot and the keyboard help. Each tile decodes its own video, so many tiles at once are hard work for the viewing computer.
Footage on network or mirrored storage
Section titled “Footage on network or mirrored storage”Footage plays the same way wherever it is stored. Segments on an SMB or SFTP destination are streamed through Aperture, which reads them from the share as you play; seeking can be slower than from a local disk. When a camera records to several destinations and the main copy cannot be read, for example because the share is down, Aperture plays a mirror copy instead.
Footage recorded to a network destination is written to a local holding area first and appears on the timeline once it has been uploaded. Aperture checks for finished segments every 8 seconds, so the newest few seconds near the live edge can lag behind a local disk. While the share is unreachable, footage waits locally and the timeline fills in when the share comes back. See Storage and Recording pipeline.
Removing footage
Section titled “Removing footage”Administrators can delete a stretch of footage from Playback.
- Zoom and scrub so the timeline shows the stretch you want to delete. The removal covers exactly the span the timeline shows, cut off at the present.
- Click Manage under the timeline, then Remove footage….
- Check the camera and the times in the Remove footage? dialog and click Remove.
This deletes the camera’s recordings and events in that range. It cannot be undone, and it is recorded in the activity log; see Security. It removes every copy of each recording, on the main destination and on every mirror destination; a copy that can’t be deleted right now is kept and tried again later.
The other Manage entries, Download clip and Timelapse export, open the export dialog; see Export and share.
On a phone
Section titled “On a phone”Phones get a simpler Playback with a touch timeline; see On your phone.
When playback fails
Section titled “When playback fails”- A red “playback failed” line at the bottom of the picture gives the reason. The player retries on its own first: it nudges past small holes in the footage, reloads, and as a last resort rebuilds itself. The message disappears as soon as the video moves again.
- “this browser cannot play HLS” means the browser supports neither Media Source Extensions nor native HLS. Use a current Chrome, Edge, Firefox or Safari.
- Black picture for an H.265 camera has the same cause as in live view: the browser cannot decode H.265. See Live view.
- Grey rail where you expect footage: check the camera’s recording mode and schedule in Recording, and its retention.
Related: Live view, Events and alarms, Export and share, Recording.