
Add cameras
This page shows how to add a camera to Aperture, check that it works before you save it, and look after it later: editing, changing its password, switching it off and deleting it. At the end there is a table of the usual stream addresses for popular brands.
What Aperture needs from a camera
Section titled “What Aperture needs from a camera”Aperture needs one thing from a camera: an RTSP stream. RTSP (Real Time Streaming Protocol) is the standard way an IP camera hands out its live video on your network. You give Aperture an address such as:
rtsp://<user>:<password>@192.168.1.21:554/stream1It contains the protocol (rtsp://), the camera’s login, its address and port (554 is the RTSP default), and a path that names the stream. The path differs by brand; see RTSP addresses by brand. Nearly every IP camera speaks RTSP, though some hide it behind a setting that is off by default. Aperture accepts rtsp://, rtsps:// (RTSP over TLS) and rtspx:// (RTSP over TLS without a certificate check) addresses.
Most cameras offer two streams:
- The main stream is the full-resolution picture.
- The sub stream is a second, smaller copy of the same picture (for example 640×360), meant for previews and analysis.
Give Aperture both when your camera has them. What each one is used for is explained in Main stream and sub stream.
Aperture does not search the network for cameras. You add each one by its address.
Add a camera
Section titled “Add a camera”You need an administrator account.
- Open Devices in the navigation rail and click Add camera. The Add camera dialog opens.
- Under General, enter a Camera name, for example “Front door”.
- Under Streams, paste the camera’s main RTSP address into Main stream (RTSP URL).
- If the camera has a sub stream, paste its address into Sub stream (optional, used for motion).
- Click Test connection. Aperture connects to the camera and shows a still from it under the button. If it cannot, it shows the reason instead; see Test connection.
- Under Recording, pick a Recording mode and the Retention (days). The defaults are 24/7 continuous and 7 days.
- Change anything else you need (each section is described below), then click Add camera.
The camera appears on the dashboard and in the device list within seconds.
If the new camera would take the machine past what its hardware runs well, Aperture asks Add camera anyway? before saving. You can still add it; recording, live view and playback may stutter. The estimate is explained in Capacity. Until Test connection has shown the camera’s real resolution, a new camera is counted as a 4K camera.
Main stream and sub stream
Section titled “Main stream and sub stream”| Stream | Used for |
|---|---|
| Main stream | Recording (by default), snapshots, and live view at the Auto and High quality settings. |
| Sub stream | Motion detection and the frames Aperture’s own object recognition looks at, live view when you pick Low quality, and recording when Settings › General › Recording quality is set to Prefer low quality — sub stream (saves space). |
A camera without a sub stream uses its main stream for all of these. Motion detection decodes every frame it reads, so a sub stream saves a lot of CPU: decoding a 640×360 picture costs a fraction of decoding 4K. See Motion detection and Capacity.
Test connection
Section titled “Test connection”Test connection asks go2rtc, the stream broker Aperture runs beside it, to open the main stream, takes one frame and closes the stream again. Nothing is saved. The test gives up after about 12 seconds.
It tests the main stream only. A wrong sub stream address shows up later as a camera whose motion detection or low-quality live view does not work.
| Message | What it usually means |
|---|---|
| could not reach the camera | Wrong address or port, the camera is off, or the server cannot reach its network. |
| no video from the camera (check URL/credentials) | The camera answered but refused the login, or the path names no stream. |
| no frame received | The stream opened but no picture arrived in time. |
| must be an rtsp://, rtsps:// or rtspx:// URL | The address does not start with one of these. |
The rest of the form
Section titled “The rest of the form”The dialog has these sections. The same fields appear when you edit a camera later.
Recording
Section titled “Recording”- Recording mode: 24/7 continuous, Motion only, Scheduled or Off. Off keeps the camera for live view only. For Scheduled, save the camera first, then open it again and click Edit recording schedule.
- Retention (days): how long footage is kept, at least 1 day.
- Recording quality: Resolution, Framerate and Bitrate, each Original or Automatic by default. At the defaults Aperture stores exactly what the camera sends and uses almost no CPU. Lowering any of them makes Aperture re-encode the recording to H.264, which takes about one CPU core per camera. Live view stays at full quality either way.
- Storage: where new footage is written, and with more than one destination, Also record to for copies elsewhere, each with its own retention. Existing recordings stay where they are.
Recording explains the modes, schedules and retention; Storage explains destinations.
Detection
Section titled “Detection”- Motion detection: on by default. With Motion only recording it is always on, because that mode needs the trigger. Below it: Sensitivity (from Low to Very high, default Medium), Ignore blips under (s), Pre-roll (s), Post-roll (s) and Cooldown (s) (each 5 seconds by default, blips 0 = off), and Edit motion zones once the camera is saved.
- Object recognition: Same as Settings, On (this server), Off for this camera or External detector. It runs only while the camera sees motion. Set it up in Settings › Detection first; see Object recognition.
- Audio detection: off by default. Raises an “audio” event when the camera’s sound gets loud, with a Threshold slider. It needs a camera with a microphone.
See Motion detection for zones and tuning.
Integrations
Section titled “Integrations”- Overlay temperature: shown only while the Home Assistant integration is on. Replaces the outdoor weather on this camera’s overlay with a Home Assistant thermometer. See Home Assistant.
- Show in Home Assistant & HomeKit: on by default. Turn it off for a camera those systems already get another way.
- Reolink camera: turns on Reolink’s spotlight and night-vision controls for this camera. See Reolink spotlight and night vision.
- Groups: which dashboard groups the camera appears in. Create groups in Settings › Camera Groups first.
Edit a camera
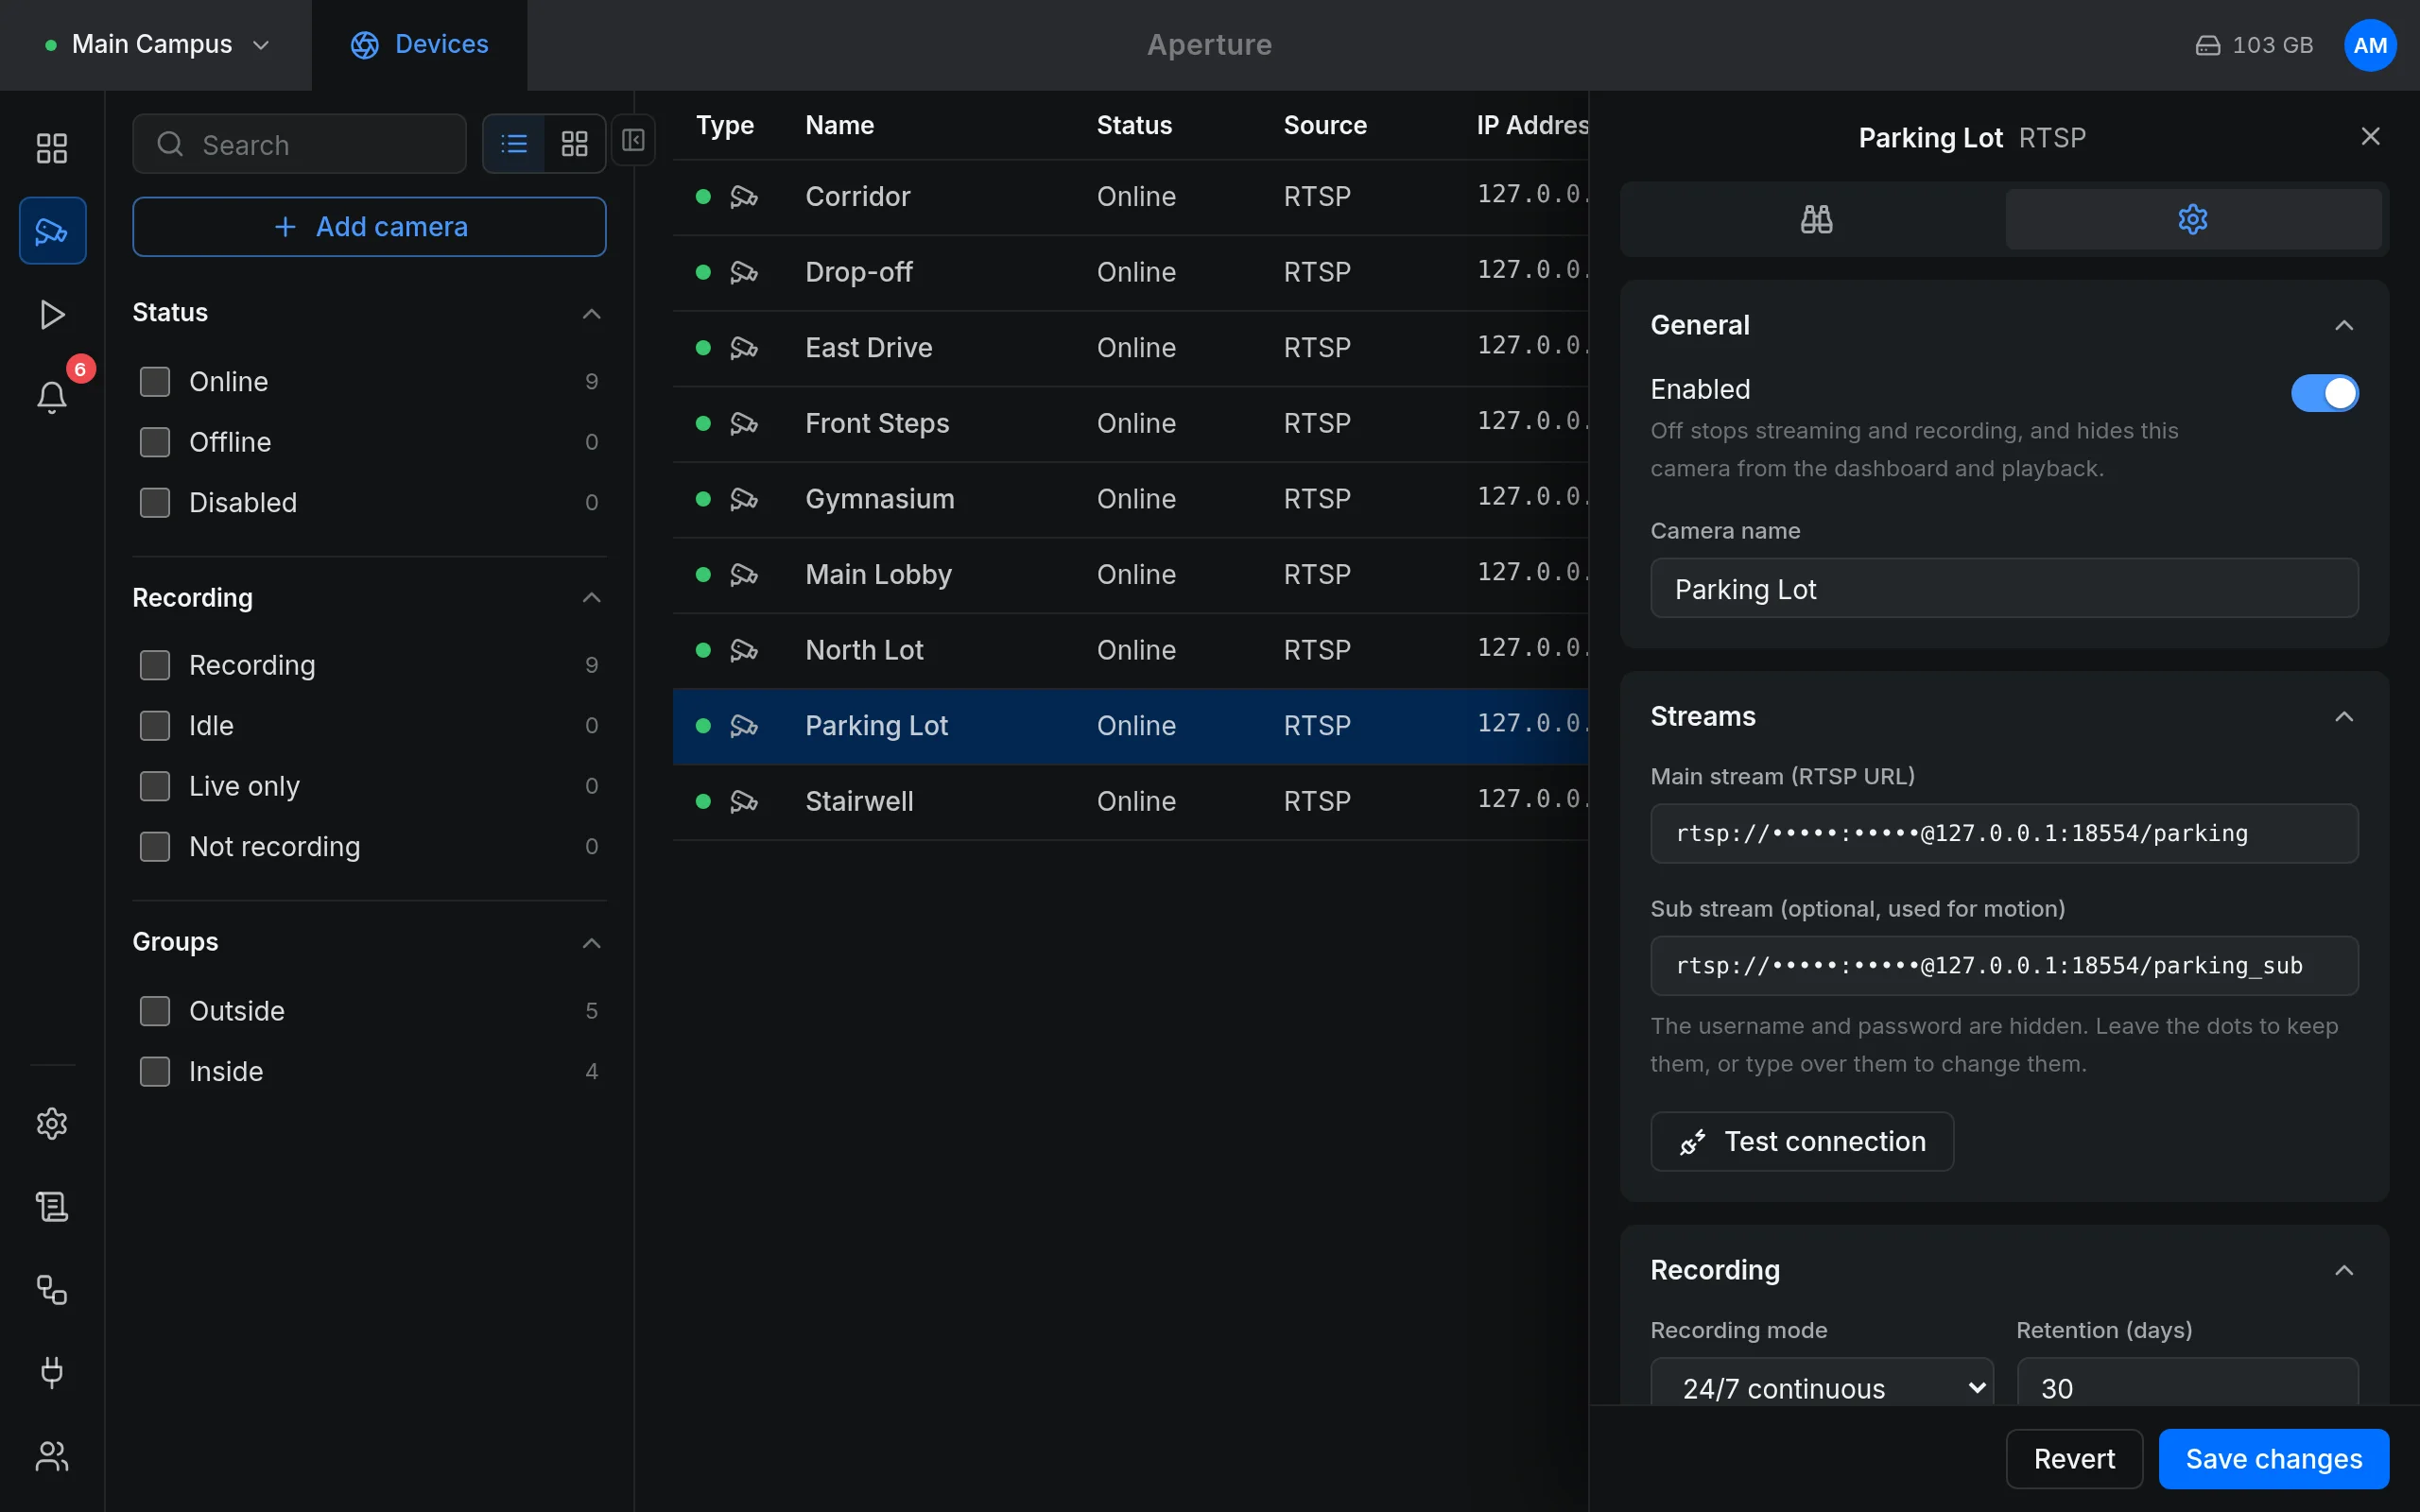
Section titled “Edit a camera”- Open Devices and click the camera’s row. A side panel opens with an Overview tab and, for administrators, a Settings tab.
- Open Settings. It holds the same sections as the add dialog, plus Picture & controls and Manage.
- Change what you need and click Save changes, or Revert to throw your changes away.
While watching a camera live or in playback, the Camera settings button (the gear over the picture) opens the same fields in an Edit camera dialog.
Changing the name, mode or retention does not interrupt the camera’s stream. Changing a stream address reconnects it, and changing the storage destination or recording quality restarts that camera’s recorder so new footage lands in the new place.
Camera passwords stay on the server
Section titled “Camera passwords stay on the server”Once a camera is saved, its login never leaves the server again. The web app, nvrctl and the API show its links with the username and password replaced by dots:
rtsp://•••••:•••••@192.168.1.21:554/stream1- Leave the dots to keep the saved login. You can change the rest of the link, for example the path.
- Type over the dots to set a new username or password. Replace all of the dots in that part; a half-edited placeholder is refused with “replace all of the dots with the new username or password, or leave them untouched to keep the saved one”.
- Change the address, and you must type the login again. The saved login is only ever sent to the address it was saved for, so editing the address cannot redirect your password to another machine. The editor says so under the field before you save.
- Change the password in the main stream, and the sub stream follows, if both used the same login on the same address. A sub stream with its own login is left alone.
Test connection works with the dots in place: the server fills the saved login back in for the test.
The links are stored, login included, in Aperture’s database and in go2rtc’s configuration file. Both files are readable only by their own service user. When Test connection fails, the login is removed from the error before it is shown.
Turn a camera off or delete it
Section titled “Turn a camera off or delete it”To pause a camera without losing anything, open it in Devices, switch off Enabled at the top of Settings, and click Save changes. A disabled camera stops streaming and recording and disappears from the dashboard and playback; its footage stays until retention removes it. It also drops out of ONVIF and, after the next bridge start, HomeKit. Switch it back on in the same place.
To delete a camera:
- Open it in Devices and go to Settings.
- Under Manage, click Remove camera.
- Confirm with Delete camera.
A deleted camera’s device also disappears from Home Assistant, if Aperture is connected to the broker at that moment. If it is not, see stale devices.
Camera status
Section titled “Camera status”The Status column in Devices shows:
| Status | Meaning |
|---|---|
| Online | Video is actually arriving from the camera. |
| Offline | Nothing arrived for 30 seconds while something was reading the camera, or a camera nothing reads failed two checks in a row. |
| Disabled | Enabled is off. |
Aperture’s watchdog checks every 15 seconds. While the camera is recorded, watched or analysed, it counts the bytes go2rtc receives from it. A camera nothing reads (live view only, nobody watching) is asked for its stream once a minute without playing it. Being known to go2rtc is not enough to count as online. A camera reads as online until the first check has run.
The Recording column is separate:
| Recording | Meaning |
|---|---|
| Recording | Footage arrived in the last 90 seconds. |
| Idle | A scheduled camera outside its recording window. |
| Live only | Recording mode is Off. |
| Not recording | The camera should be recording, but no footage arrived for 90 seconds. |
The watchdog also restarts a camera’s stream and recorder when its recording stalls; the Overview tab shows Restarts today when that happened. Each change between online and offline is written to the server log and sent on the API’s change feed as a camera.state message.
Camera handles
Section titled “Camera handles”Each camera has an ID (32 hexadecimal characters, visible in the address bar as ?camera=… when you select it) and a handle made from its name: lowercase, with every run of other characters turned into one underscore. “Front door” becomes front_door.
The live-stream WebSocket route of the API (/api/v1/cameras/{id}/ws) accepts the handle in place of the ID. The handle is worked out from the current name each time, so renaming a camera changes its handle, and anything that used the old handle stops finding the camera. Use the ID where something must keep working through a rename.
Picture settings over ONVIF
Section titled “Picture settings over ONVIF”If the camera speaks ONVIF, Aperture can read and change its own picture settings: brightness, contrast, saturation, sharpness and day/night. Open the camera’s Settings, expand Picture & controls and switch on Camera picture settings. It is off by default, and nothing contacts the camera over ONVIF until you switch it on. Aperture signs in with the stream link’s login unless you enter a separate Camera account.
When it is on, a Picture settings button appears over the live picture, so you can adjust the image while you watch it. The details, including which ports Aperture tries, are on ONVIF and RTSP.
Reolink spotlight and night vision
Section titled “Reolink spotlight and night vision”ONVIF has no way to switch a floodlight. For Reolink cameras, Aperture talks to the camera’s own web API instead.
- Open the camera’s Settings and expand Picture & controls (when adding a camera, the switch is under Integrations).
- Switch on Reolink camera.
- If the stream link’s login is not allowed to change settings, enter one that is under Camera account.
- Click Save changes.
On cameras with a spotlight, a spotlight button then appears over the live picture to switch it on and off. If Camera picture settings is also on, the Picture settings panel adds the spotlight Brightness and Night vision (IR) (Auto or Off). When the camera refuses a change, the reason appears over the picture.
These controls act on the camera as it is now, so they appear only on the live picture, not while you review footage.
Pan, tilt and zoom
Section titled “Pan, tilt and zoom”Aperture has no built-in pan/tilt controls. The extensions shipped as examples add them for two families: Tapo Control (over ONVIF, on your own network) and Eufy Control (through the Eufy bridge).
If the camera sends audio, Aperture records it with the video. It is re-encoded to AAC at 32 kbit/s, which costs very little CPU; the video itself is still stored as the camera sends it. Live view and playback start muted; use the Unmute button in the player. Audio detection is a separate, per-camera switch (see Detection).
RTSP addresses by brand
Section titled “RTSP addresses by brand”A sampling of common cameras, not a certified list. Support varies by model and firmware, so check for “RTSP” in your camera’s manual or web interface. Replace <user>, <password> and the address with your own.
| Brand | Main stream | Sub stream | Notes |
|---|---|---|---|
| Reolink (RLC / RLN PoE, Duo, E1 Pro) | rtsp://<user>:<password>@192.168.1.21:554/Preview_01_main |
.../Preview_01_sub |
Turn on the RTSP and ONVIF ports in the camera’s network settings; they are often off by default. Battery models need a Reolink Home Hub. Mark it as a Reolink camera for spotlight and IR controls. |
| TP-Link Tapo (mains-powered C-series) | rtsp://<user>:<password>@192.168.1.21:554/stream1 |
.../stream2 |
Create a Camera Account in the Tapo app first and use it in the link; your TP-Link cloud login does not work here. ONVIF is on port 2020. |
| Hikvision and rebrands (Annke, Hilook and others) | rtsp://<user>:<password>@192.168.1.21:554/Streaming/Channels/101 |
.../Streaming/Channels/102 |
ONVIF has to be enabled and uses its own user. |
| Dahua and rebrands (Amcrest, Imou) | rtsp://<user>:<password>@192.168.1.21:554/cam/realmonitor?channel=1&subtype=0 |
...&subtype=1 |
|
| Axis | rtsp://<user>:<password>@192.168.1.21/axis-media/media.amp |
Stream options go in the query string. | |
| Hanwha Vision (Wisenet) | See the camera’s manual | RTSP and ONVIF are standard. | |
| TP-Link VIGI | See the camera’s manual | The business line from the Tapo maker; RTSP and ONVIF are standard. | |
| UniFi Protect | rtsps://<console>:7441/<stream key> |
A second quality’s link | Switched on per camera in the Protect app; the link goes through the UniFi console. See UniFi Protect. |
| Eufy | Varies | Only some indoor and wired models offer RTSP (enable it in the Eufy app); battery cameras do not. Pan/tilt goes through a bridge that signs in to your Eufy cloud account; see Eufy cameras. | |
| EZVIZ | Varies | Many models offer RTSP, with the device’s verification code as the password. | |
| Wyze | Varies | RTSP only on certain models with special firmware. | |
| Ring, Google Nest, Blink, most Arlo | Not available | Cloud-only; they expose no local stream. | |
| DIY (Raspberry Pi camera, an old phone) | Your server’s address | Run a small RTSP server such as MediaMTX on the device. |
- Give cameras fixed addresses. A DHCP reservation in your router is enough. A camera that moves to a new address stops working, and because the saved login only goes to the address it was saved for, you have to type the login again after fixing the address.
- Put cameras on their own network. A separate VLAN with no internet access keeps cameras from talking to their vendor’s cloud. The Aperture server still needs to reach them on the RTSP port (554 by default), and on the ONVIF port and the camera’s web port (80 or 443) if you use picture settings or Reolink controls.
- Use H.264 for the sub stream. Aperture records H.265 fine, but whether a browser can show H.265 live depends on the browser and device. If the camera lets you choose, set the sub stream to H.264.
- Keep the camera password simple, or percent-encode it. A password containing
@,:,/,?,#or%can break the link. Either use letters and digits, or write those characters encoded:@as%40,:as%3A,/as%2F,?as%3F,#as%23,%as%25. Some cameras mishandle special characters even when they are encoded. - Prefer wired cameras. Battery cameras usually offer no continuous stream, and Wi-Fi drops show up as gaps in the recording.
Troubleshooting
Section titled “Troubleshooting”- Test connection fails. Open the same link in VLC (Media › Open Network Stream) on another computer. If VLC cannot play it either, the problem is the camera: RTSP is switched off, the account or path is wrong, or the password has special characters. If VLC plays it, check that the Aperture server can reach the camera:
ping 192.168.1.21from the server. - “The camera’s address changed, so enter its username and password again.” You edited the host part of a link that still carries the dots. Replace the dots with the login.
- “This camera has no saved login yet. Replace the dots with the camera’s username and password.” You pasted a masked link, for example copied from another camera, into a new camera. Masked links only work on the camera they came from.
- The tile is black but the camera is online. The camera probably sends H.265 and the browser cannot show it. Switch the player to Low quality with an H.264 sub stream, or change the main stream’s codec on the camera.
- The camera flips between online and offline. Check its network link and power. Restarts today in the camera’s Overview tab shows how often the watchdog had to restart it.
Related: Recording · Live view · Motion detection · UniFi Protect