
Extensions
Extensions add features to Aperture without a fork or a rebuild. This page explains what an extension can do, how to switch the extension system on, how to install, configure, update and remove an extension, and how to build your first one. The pages under Extensions in the sidebar are the reference for authors.
What an extension can do
Section titled “What an extension can do”An extension is a zip bundle with a manifest.json at its root. It contributes one or both of these:
| Kind | What it is | How it reaches Aperture | How it reaches the network |
|---|---|---|---|
| UI extension | One or more HTML pages that Aperture shows in sandboxed iframes at fixed places in the app, called slots | window.aperture, which relays each call through Aperture under the viewing user’s own rights |
window.aperture.net.fetch, performed by the server, only to hosts the extension declared |
| Backend extension | A headless TypeScript program that Aperture runs with Deno and keeps running | @aperture/sdk, which calls the HTTP API with the extension’s own scoped token |
Deno’s fetch, only to hosts the extension declared |
A UI extension can put a card on the Dashboard, a panel under a camera’s picture, a section in Settings, a full page in the navigation rail, a button in the player’s control cluster, or a widget floating over the video. A backend can react to the change feed (a new event, a camera going offline, the alarm being armed) while nobody is watching, and talk to a device or service on your network.
Everything an extension may do is declared in its manifest and shown to you before it is installed. An extension:
- reads and changes Aperture data only through the API, only within the permissions you approve, and only for the cameras you choose;
- never reads the database, the recordings,
secrets.json, Aperture’s own files or another extension’s files; - cannot start other programs, load native code or read the server’s environment.
Turn on extensions
Section titled “Turn on extensions”Extensions are an administrator feature and are off on a new install. Until an administrator accepts the extension gate, Aperture refuses every install, shows no panels and starts no backends.
There is no screen for the gate yet. Accept it with the local CLI token, on the server, by typing the confirmation phrase into the request:
sudo sh -c 'curl -fsS -X POST http://127.0.0.1:8971/api/v1/ext/gate \ -H "Authorization: Bearer $(cat /var/lib/aperture/data/cli.token)" \ -H "Content-Type: application/json" \ -d "{\"confirm\": \"enable extensions\"}"'The reply is {"enabled":true}. The address is the one in APERTURE_URL in /etc/aperture/aperture.env, and the token lives in the data directory (APERTURE_DATA_DIR); adjust both if you changed them. The CLI token is a full administrator credential, so keep it readable by root only. See nvrctl for more on it.
To switch extensions off again:
sudo sh -c 'curl -fsS -X DELETE http://127.0.0.1:8971/api/v1/ext/gate \ -H "Authorization: Bearer $(cat /var/lib/aperture/data/cli.token)"'Turning the gate off stops every backend, revokes every extension’s token, hides every panel and refuses new installs. While it is off, nothing starts a backend: not the Enabled switch, saving settings or cameras, editing files, an update or a revert. Installed extensions, their settings, stored data and camera choices stay in place, and turning the gate back on starts every extension that was enabled, each with a new token.
Backend extensions need Deno. The installer ships Deno 2.9.5 at /usr/lib/aperture/bin/deno (APERTURE_DENO_PATH) and the SDK at /usr/lib/aperture/sdk/mod.ts (APERTURE_EXT_SDK). UI-only extensions need neither.
Install an extension
Section titled “Install an extension”- Open Settings › Extensions and click Add extension. The Add extensions dialog opens.
- Choose where the extension comes from:
- Upload file: pick a bundle
.zipfrom your computer. - Paste a link to a bundle (
https://…/bundle.zip) and click Fetch. Aperture downloads it on the server. - Under Store, click Install next to an extension. This needs a store to be configured; see Install from a store.
- Upload file: pick a bundle
- Aperture unpacks and checks the bundle. If the manifest is invalid, the bundle is too large, or the code imports remote modules, the reason appears in red in the dialog and nothing is installed.
- Read the Install extension dialog (see What you are asked to approve). If the extension asks for cameras, choose them.
- Click Install. The extension is enabled straight away and its backend, if it has one, starts.
- If the dialog said “After installing, configure this extension from its row in Extensions before it can run”, open its row and fill in Settings.
A bundle may be at most 50 MiB, and each file in it at most 50 MiB. A link must be an absolute http or https address that answers within 20 seconds with HTTP 200. Aperture fetches links from any address you give it, including addresses on your own network, because only an administrator can ask it to.
Uploading or fetching a bundle whose id is already installed is an update, not a second copy; see Update an extension.
Install from a store
Section titled “Install from a store”A store is a JSON index that lists bundles. Aperture reads it from the server, never from your browser. With no store configured, the Store section reads No store is configured., and you install from a file or a link instead.
The index has exactly these fields; unknown fields are ignored:
{ "extensions": [ { "id": "com.example.room-lights", "name": "Room Lights", "version": "1.2.0", "author": "Alex", "description": "Control a camera's room light from its camera view.", "bundleUrl": "https://store.example.com/room-lights/bundle.zip" } ]}bundleUrlis used by the server only and is never sent to the browser. A missing or misspelledbundleUrlmakes the install fail with “no such store item”.versionis for display. What decides whether an installed extension has an update is the manifest at its ownupdate.url.- The index is fetched when you open Add extensions, at most once a minute, with the same limits as a link (20 seconds; 8 MiB for the index).
Store installs show a Store label instead of the sideload warning, and store rows show Reviewed. Aperture does not review anything itself: these labels mean only that the item came from the index you configured. The install, consent and sandbox are the same for every source.
The store address is the ext.store_url setting. There is no screen, command or environment variable for it yet; it is a row in the settings table of the database:
sudo sqlite3 /var/lib/aperture/data/aperture.db "PRAGMA busy_timeout=5000; \ INSERT INTO settings(key, value) VALUES('ext.store_url', 'https://store.example.com/index.json') \ ON CONFLICT(key) DO UPDATE SET value = excluded.value;"What you are asked to approve
Section titled “What you are asked to approve”The Install extension dialog shows the extension’s name, version, author and description, and where it came from: Store or Sideloaded. A sideloaded extension (from a file or a link) carries a red warning that it “has not been reviewed by anyone”. Only continue if you trust where it came from.
Under This extension will be allowed to: Aperture lists the permissions in plain language. The wording comes from the manifest, so it is the same for every extension:
| Line | Comes from |
|---|---|
| Read your cameras, events | permissions.data asking only for read access, listing the areas it touches |
| Read and change your site | permissions.data with any write access, or alarm |
Connect over the internet to hooks.example.com — it can send your data there |
A fixed network host |
Talk to 127.0.0.1:8788 — a service running on this machine, not over the internet |
A fixed host on this machine |
| Connect to a server you configure in its settings — it can send your data there | A network host taken from one of its settings |
| Store its settings — including any secrets you enter — in a private folder | A settings form |
| Keep its own settings in a private folder | storage: true without a settings form |
| It cannot read your recordings files, your database, or your passwords. | Always shown |
“Connect over the internet” lines are highlighted because they are the consequential ones. A host on your own network that is not this machine still reads “over the internet”.
If the extension asks for cameras, a camera section follows, headed by one line that matches what it can see: “Watch your cameras’ live video”, “See your cameras and their events”, or “Add its controls to your cameras’ views” for an extension that only places controls. The request is a default you narrow:
- An extension that asks for all cameras offers All cameras (“Including any camera added later”) or Only the cameras I choose (“Exactly these — cameras added later are not granted”).
- An extension that names specific cameras shows only those, and you can only remove from the list.
You can change this later from the extension’s row. Permissions explains each permission and how it maps onto API scopes.
Manage an installed extension
Section titled “Manage an installed extension”Settings › Extensions lists every installed extension with its Name, Version, Status and an Enabled switch. The line under the name shows the author, Store or Sideloaded, and Edited or Pinned when they apply.
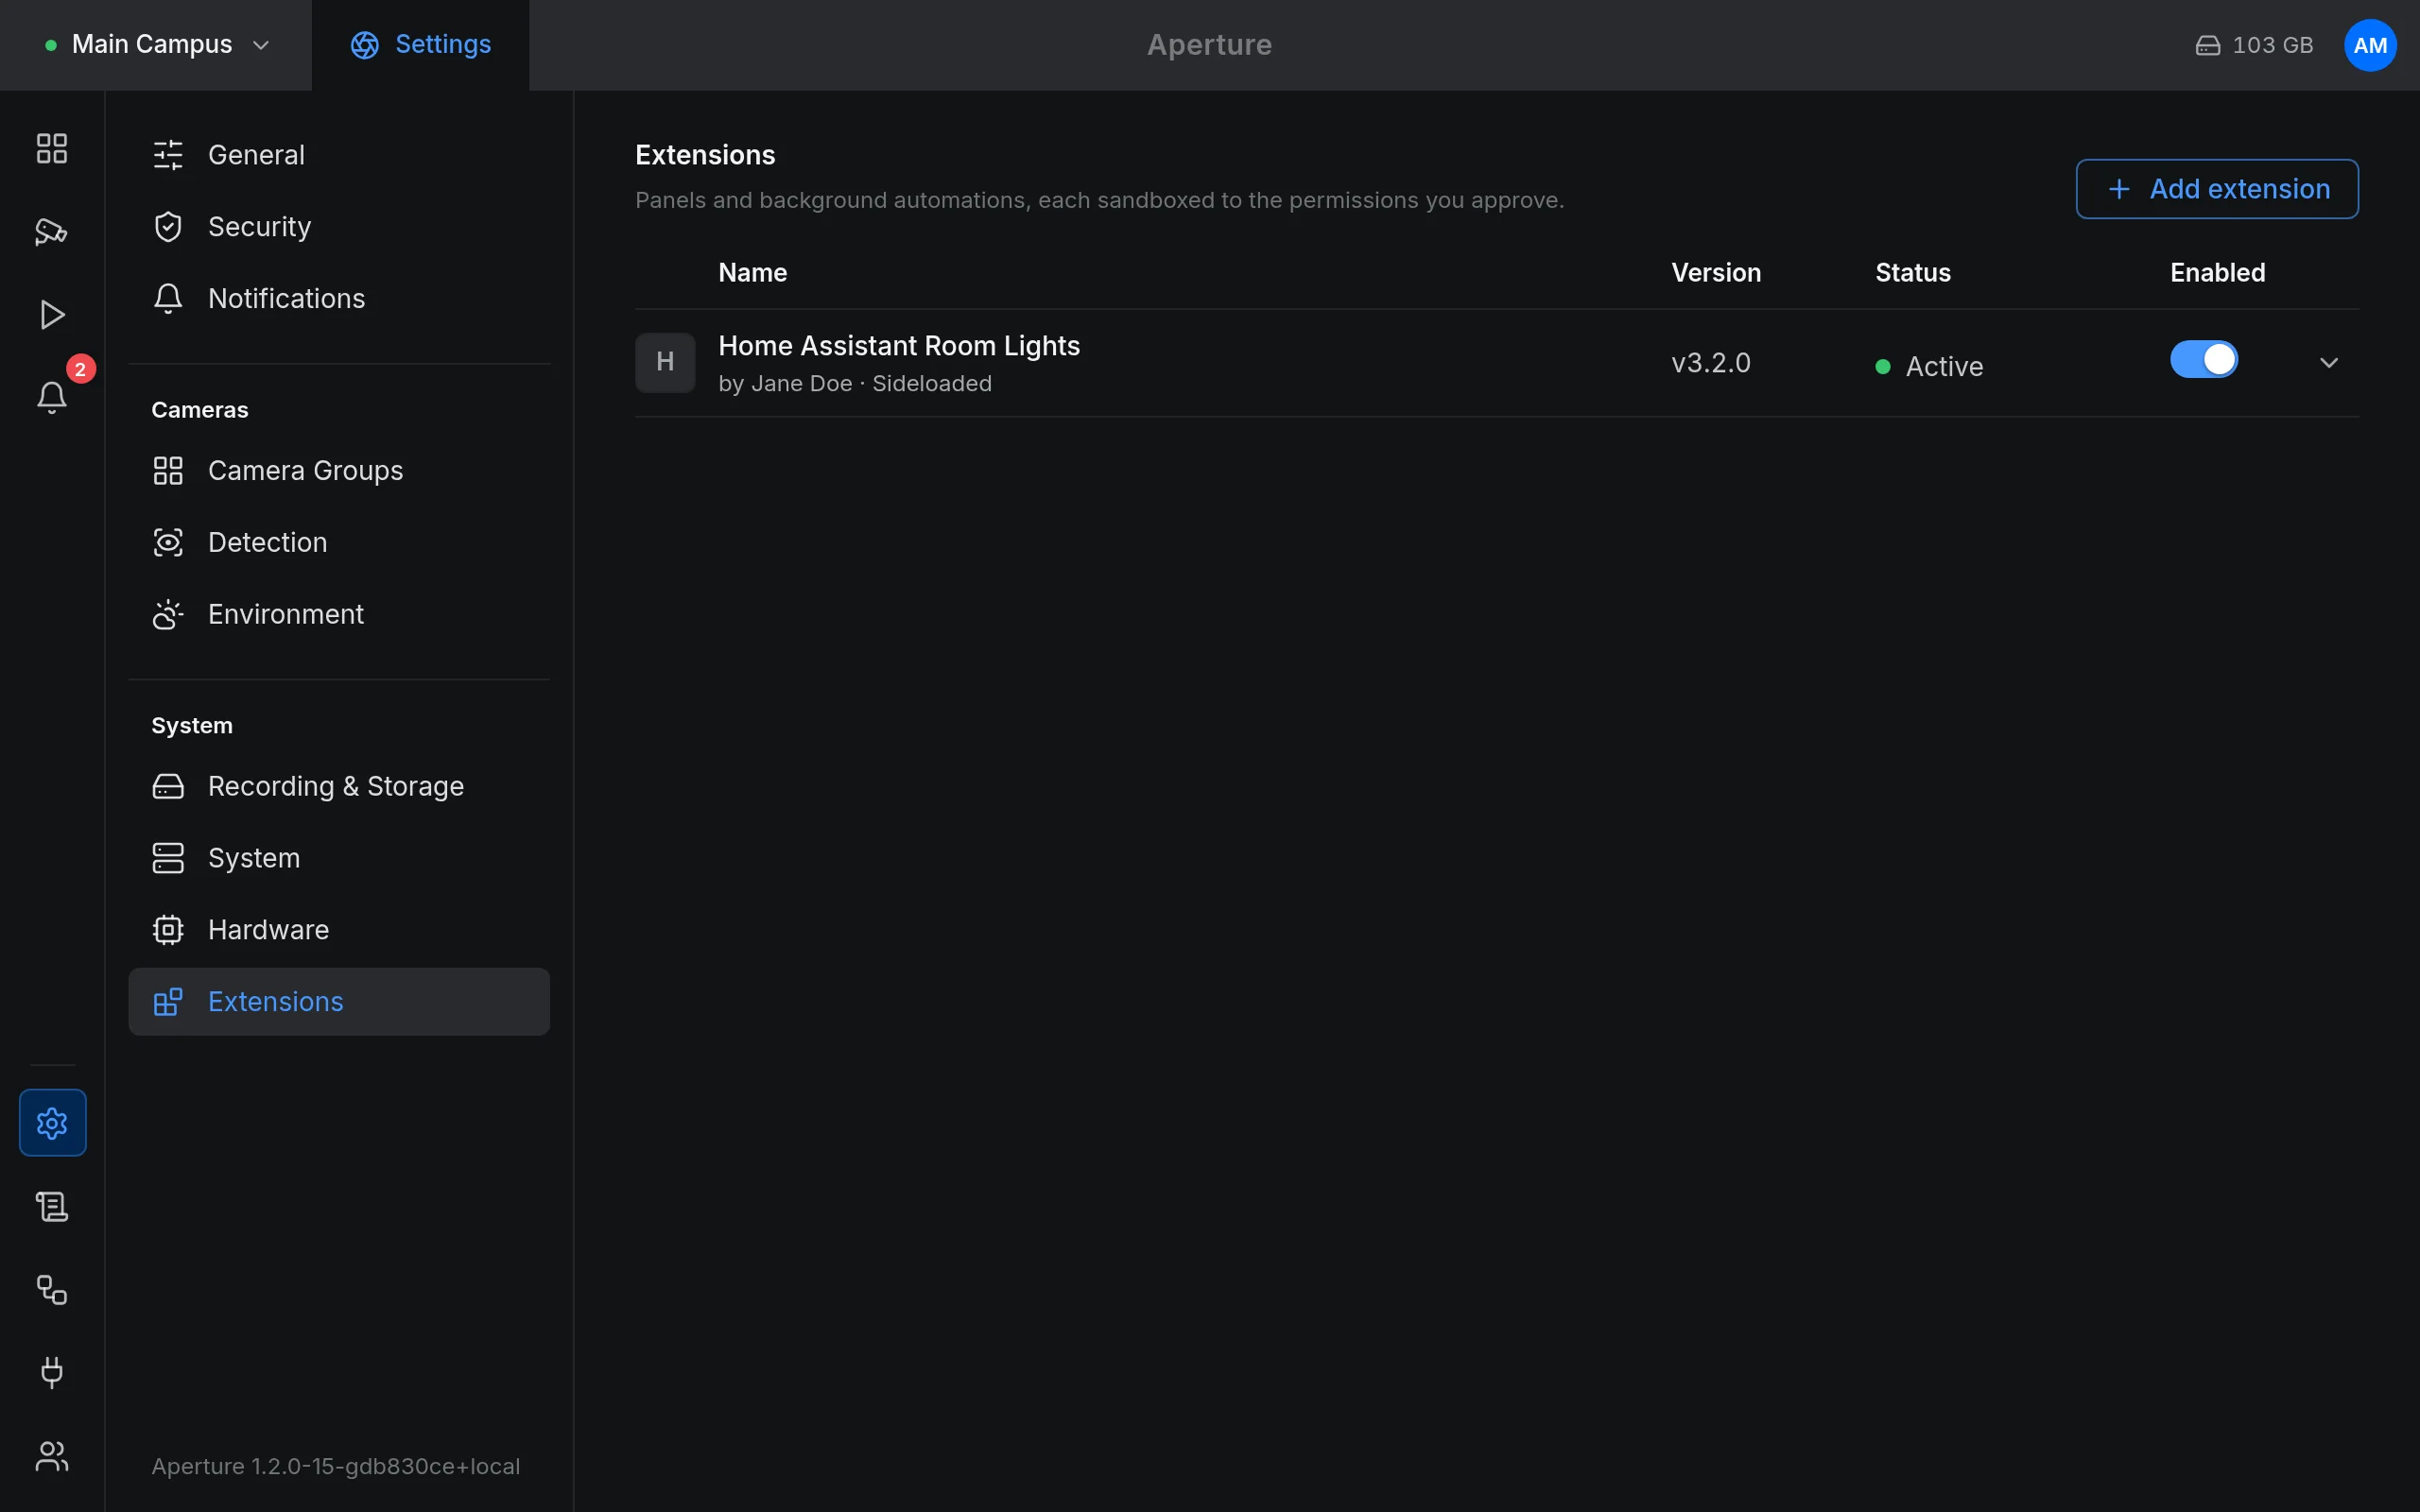
The screenshot shows an earlier layout; the button now reads Add extension and the list has column headings.
| Status | Meaning |
|---|---|
| Active | A UI-only extension that is enabled |
| Running | The backend process is up |
| Starting | The backend is starting or waiting to restart after a crash |
| Stopped | The backend is not running |
| Needs attention | The backend kept crashing and Aperture stopped restarting it |
| Disabled | The extension is switched off |
Click a row to open it. Depending on the extension, it shows these sections.
Permissions
Section titled “Permissions”The same plain-language lines you approved at install, for the version that is installed now.
Settings
Section titled “Settings”A form built from the extension’s own settings: text, numbers, switches, lists, addresses, camera pickers and repeatable lists of rows. Secret fields show “•••••••• — set (leave blank to keep)” once a value is stored; nobody can read a stored secret back, you can only replace it. Click Save settings. For an extension with a backend, saving restarts it so it picks up the new values. See Settings and storage.
Cameras
Section titled “Cameras”Shown for an extension that asked for cameras: “Which cameras this extension can see. Changing it re-scopes the extension — no re-consent.” Change the choice and click Save. Panels follow the new choice straight away and appear only on the cameras you chose. A backend restarts with a new token limited to the new choice; the old token is revoked. You cannot save an empty selection; to remove all access, disable the extension.
Pin to sidebar
Section titled “Pin to sidebar”Shown only for an extension with a full-page view (the nav-panel slot). Pinning gives it its own icon in the navigation rail, for every user, and its page at /extensions/<id>. The extension must be enabled to pin it. The rail is the desktop layout; pinned extensions do not appear in the phone’s bottom bar.
Shown for an extension with a backend: the last 200 lines the process wrote to standard output or standard error, plus Aperture’s own notes such as [supervisor] exited after 1.2s (exit status 1); restarting in 2s. The view refreshes every 3 seconds while the backend runs. The same lines go to Aperture’s own log, tagged with the extension id. The buffer lives in memory and starts empty after Aperture restarts.
Edit files
Section titled “Edit files”Edit files opens an editor with every file in the installed bundle. Change a file and click Save (or press Ctrl+S or Cmd+S). Aperture writes the file and marks the extension Edited. Panels load the new file the next time they are opened. Files up to 2 MiB can be edited; binary files cannot.
For an enabled extension with a backend, every save restarts the backend, so it runs the new code, with a new token that replaces the old one.
Editing manifest.json here does not change the extension’s permissions. Aperture enforces the manifest it stored at install or update, so to change permissions, install a new version.
Update an extension
Section titled “Update an extension”There are two ways to update:
- From the extension’s update source. If the manifest has an
update.url, Aperture checks it each time you open Settings › Extensions. When it finds a higher version, the row shows a blue Update label and, when opened, “Version 1.3.0 available · you have 1.2.0” with an Update button. - By installing the new bundle with Upload file or a link. Aperture recognises the id and opens Review update: “Replacing version 1.2.0 with version 1.3.0. Its settings and camera choice are kept; the current files are snapshotted so you can revert.”
An update keeps the extension’s stored data, its secrets and your camera choice, fitted to the new version’s camera request (see Permissions). Settings that the new version removed, or whose type changed, are deleted; new settings get their defaults. The extension gets a new token with the new version’s permissions, and the backend restarts. Edits made with Edit files are replaced by the new bundle.
When the new version asks for more than the installed one has, the row adds “· needs new permissions”, and Update opens the Review update dialog, which flags “This version requests permissions the installed one didn’t — review them.” More means a new API permission, a new network host, a new camera request, storage, or a backend where there was none; the full list is in Updates and consent. The dialog also opens when the bundle Aperture downloads asks for more than the update source’s manifest said. An update that asks for nothing new is applied without a dialog.
Installing an older version than the one installed asks you to tick “This is a downgrade” first, and the button reads Downgrade to v1.1.0. Versions are compared on their major.minor.patch numbers only; a pre-release suffix such as -beta.1 is ignored when comparing.
Revert update
Section titled “Revert update”After an update, Revert update puts back the files and manifest from before it. Aperture keeps one snapshot: reverting uses it up, and the version you reverted from is discarded. Your camera choice and stored data stay as they are.
Disable or uninstall
Section titled “Disable or uninstall”| Enabled switch off | Uninstall | |
|---|---|---|
| Backend | Stopped | Stopped and removed |
| API token | Revoked; a new one is issued when you enable it again | Revoked |
| Panels and nav entry | Hidden | Gone |
| Files | Kept | Deleted, along with the update snapshot |
| Settings, secrets and stored data | Kept | Deleted |
| Camera choice | Kept | Deleted |
Uninstall asks first: “Its files and stored data are deleted. This cannot be undone.”
When a backend keeps crashing
Section titled “When a backend keeps crashing”When a backend exits on its own, Aperture restarts it after 2, 4, 8 and then 16 seconds. A run that lasts 30 seconds or more resets the count. After five crashes in a row that each came within 30 seconds of starting, Aperture stops trying: the status becomes Needs attention and the row explains “This extension keeps crashing and has been stopped.” with the last exit reason. Read Logs, fix the cause (often a missing setting), then switch Enabled off and on to start it again.
When Aperture stops, it sends each backend SIGTERM and waits up to 5 seconds before killing it.
The examples
Section titled “The examples”The repository ships four example extensions in examples/, with ready-built bundles in examples/dist/ that you can install with Upload file.
| Example | Kind | Slots | What it does |
|---|---|---|---|
ha-room-lights |
UI | camera-detail |
Controls the Home Assistant light mapped to the camera you are viewing: on and off, brightness, colour and white temperature, showing only what the bulb supports |
motion-webhook |
Backend | none | POSTs a JSON message to a webhook for every new event on a granted camera |
tapo-control |
UI and backend | player-osd, player-toolbar |
Pan and tilt for TP-Link Tapo cameras over ONVIF on your own network, with a jog wheel over the picture and a device menu in the player toolbar |
eufy-control |
UI and backend | player-osd, player-toolbar |
The same controls for Eufy cameras, through an eufy-security-ws server that you run |
ha-room-lights is the reference for a UI extension. Its settings hold the Home Assistant address (a url setting that is also its only network host), a long-lived access token (a secret) and a repeatable list that maps each camera to a light entity. The panel reads the camera on screen, finds its light in that list and calls Home Assistant through net.fetch with {{secret:ha_token}} in the Authorization header, so the token never reaches the browser.
motion-webhook is the reference for a backend. It subscribes to event.created, reads webhook_url and the optional auth_token secret from its storage, and sends {"text": "Motion detected on <camera>", "camera": "<id>", "at": <time>}. It fires on every new event, whatever its type. Its network permission is the fixed host https://hooks.example.com, so to use another webhook host you change permissions.network and rebuild the bundle.
tapo-control and eufy-control show a backend and its panels working together. The camera password (Tapo) or the WebSocket connection (Eufy) has to stay on the server, so the backend holds it and serves a small control API on 127.0.0.1:8788 (Tapo) or 127.0.0.1:8787 (Eufy). The panels reach that API through net.fetch, because the manifest declares the loopback address as a network host. Tapo’s camera addresses come from a list setting with one ONVIF address per camera, declared as {{setting:cameras.address}}, so the extension may contact exactly the addresses you typed.
The ha-room-lights and eufy-control manifests carry an update.url that points at a development store which does not exist on your server; their update check fails quietly.
Build a bundle
Section titled “Build a bundle”A bundle is a zip with manifest.json at the top level and two optional folders:
manifest.json required: identity, permissions, entry pointsui/ panel HTML; the only folder Aperture serves to browsersbackend/ the Deno entry and any local modules it importsmanifest.json must sit at the root of the zip, not inside a folder. Zip the contents of your extension folder, not the folder itself:
cd my-extensionzip -r ../my-extension.zip manifest.json ui backendLeave out ui or backend if you do not have one. Aperture rejects a zip with an entry that contains .. or starts with /.
From a checkout of the repository you can also use the bundler the examples use. It builds every subfolder that contains a manifest.json into <name>.zip, with sorted, uncompressed entries and a fixed timestamp, so an unchanged extension produces an identical file:
go run ./tools/mkbundles -src ./my-extensions -out ./my-extensions/distmake examples runs the same tool over examples/ into examples/dist/. The test TestExampleBundlesAreFresh fails when a committed example zip no longer matches its source, so run make examples after changing an example.
Your first extension
Section titled “Your first extension”These two extensions are small enough to type in, and their manifests pass Aperture’s checks as written. Install either with Upload file after turning on extensions.
A UI panel
Section titled “A UI panel”This panel shows which camera you are looking at and whether it is online. Create this layout:
hello-panel/ manifest.json ui/panel.htmlmanifest.json:
{ "manifest": 1, "id": "com.example.hello-panel", "name": "Hello Panel", "version": "1.0.0", "author": "Alex", "description": "Shows the camera you are looking at.", "minApiVersion": "v1", "permissions": { "data": { "cameras": "read" }, "cameras": "all" }, "ui": { "panels": [ { "slot": "camera-detail", "entry": "ui/panel.html", "title": "Hello" } ] }}The panel reads camera data, so it must ask for cameras; "all" lets you choose at install. ui/panel.html:
<!doctype html><html lang="en"><head><meta charset="utf-8"><style> body { margin: 0; padding: 14px; background: transparent; color: #f2f4f5; font: 13px/1.5 system-ui, sans-serif; } .muted { color: #a5a8ac; }</style></head><body> <p class="muted">You are looking at</p> <p id="name">…</p> <script> (async () => { const el = document.getElementById("name"); const id = window.aperture.cameraId; if (!id) { el.textContent = "no camera"; return; } try { const cam = await window.aperture.cameras.get(id); el.textContent = (cam.name || id) + (cam.online ? " (online)" : " (offline)"); } catch (e) { el.textContent = "Could not load the camera: " + e.message; } })(); </script></body></html>Everything is inline: the panel’s security policy blocks external scripts, stylesheets, fonts and images. Zip it, install it, then click a camera on the Dashboard. The panel appears under the picture. UI panels covers the slots, sizing and styling.
A backend
Section titled “A backend”This backend writes a log line for every new event. Create this layout:
event-logger/ manifest.json backend/main.tsmanifest.json:
{ "manifest": 1, "id": "com.example.event-logger", "name": "Event Logger", "version": "1.0.0", "author": "Alex", "description": "Writes a log line for every new event.", "minApiVersion": "v1", "permissions": { "data": { "cameras": "read", "events": "read" }, "cameras": "all" }, "backend": { "entry": "backend/main.ts", "denoVersion": "2" }}backend/main.ts:
import { aperture, ApertureError } from "@aperture/sdk";
aperture.on("event.created", async (msg) => {  const data = (msg.data ?? {}) as { eventType?: string; score?: number };  let name = msg.camera ?? "unknown camera";  try {    if (msg.camera) name = (await aperture.cameras.get(msg.camera)).name;  } catch (err) {    if (err instanceof ApertureError) console.error("camera lookup failed:", err.status, err.message);  }  console.log(`${data.eventType ?? "event"} on ${name}`);});
console.log("event-logger ready");
The change feed needs events: "read", and looking up the camera name needs cameras: "read". Catch errors inside an async handler: an unhandled promise rejection ends a Deno process, and Aperture counts that as a crash.
Install it and open its row: Logs shows event-logger ready, then one line per event. The SDK lists everything a backend can call.
Common install errors
Section titled “Common install errors”| Message | Cause |
|---|---|
| third-party extensions are not enabled | The gate has not been accepted |
| manifest.json is missing from the bundle | The zip holds a folder with the manifest inside it, not the manifest itself |
| invalid manifest json: json: unknown field “…” | A misspelled or unsupported field; the manifest is parsed strictly |
| this extension reads camera data but does not request cameras | A cameras, events, coverage, segments or media permission without "cameras" |
| remote imports are not allowed: https://… | Code imports a module by URL; see the SDK |
| icon: … | The icon file is missing, is not a real PNG, is over 64 KiB, or is larger than 256 × 256 pixels |
| bundle is unreadable or exceeds the size limit | The upload is over 50 MiB |
| bad bundle: zip: not a valid zip file | The file is not a zip |
The manifest lists every check and its message.
Related
Section titled “Related”The manifest · Permissions · UI panels · The SDK · Settings and storage · Extension security